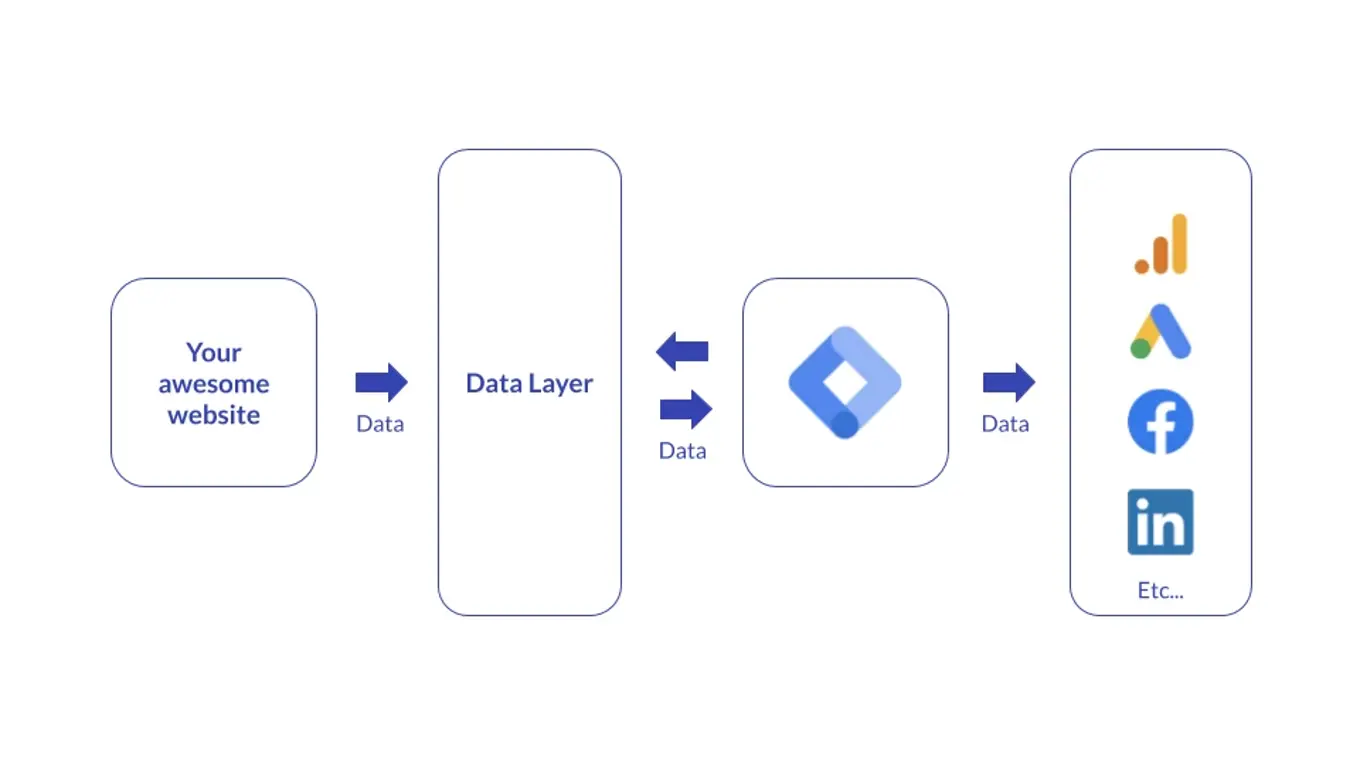
What is a Data Layer?
A Data Layer is a virtual layer between your website (code and server) and your tag management solution (such as Google Tag Manager), where you can store, process and pass data. Technically speaking it is a JavaScript object, which in some cases will also be referred to as a Universal Data Object (UDO).
Think of it like a virtual “master” layer of all data accessible on the website. When data is put into the Data Layer, it makes data from the website easily readable by a tag management solution and thereby easy to pass on to various analytics or marketing tools (Google Analytics, Google Ads, Facebook, LinkedIn, etc.). The data in your Data Layer can also be passed back to your website in the form of personalized content.

The more data that is put into this layer, the more knowledge a marketer will get about user behavior. With this added knowledge it is easier to serve better and more relevant content, ads and campaigns to the users, which in the end makes everyone win (better content = happier users = more sales).
Are you a developer looking to implement a Data Layer? Then we’ve written A developer’s guide to the Data Layer.
What can you do with a Data Layer?
The main advantage of having a Data Layer is that you will have one place to store all kinds of information, that might not be readily available in your websites presentational layer or in the markup and source code.
Data in a Data Layer is stored in an accessible and simple format, that your website, app or tag management solution can read and use. And as long as the information is properly pushed to the Data Layer, it will take care of storing it in a uniform way, so all data in the Data Layer is structured the same way.

Types of data you can put in the Data Layer
The data that you push into the Data Layer is up to you. Here is a list of common types of data pushed to the Data Layer from a website.
Visible website elements
All data that is visually presented on your website can be pushed to the Data Layer. This can be done in multiple ways to make page content such as headlines, text and images available for other tools to use. More commonly this data is pushed by using elements and classes, but can also be done directly from the DOM.
Website markup and cookie data
The next level of website data that you can push is website markup and cookie data. This data is not visually presented on the website, but is available in the source code of the page. A common usage of this data is to enhance website analytics or to enable better personalization of content.
Database data
Data from a database can also be pushed to the Data Layer. This can include user data, purchase history and any other data that might be available in the database. This data is hard to access for other tools without a Data Layer, so by pushing it there it can be used for personalization, analytics and optimization.
Ecommerce data
A very common use for the data layer is ecommerce tracking. By making product and sales information such as name and price available in the Data Layer you can effectively store this data and pass the information to various analytics platforms. This enables you to see how your ecommerce site is performing.
Third party application data
If you are using third party applications like live chat modules or marketing automation systems, then data from these systems can also be put into the Data Layer. If someone sends you a chat message, then you can push this data and make it available for your other tools.
How do you implement a Data Layer?
If you want to send data to the Data Layer, then you first need to make sure that it is actually implemented on the website. The first thing you need to do is decide on the data structure of your Data Layer. Which one to choose will depend on the tag management solution you are using.
If you are using (or planning to use) Google Tag Manager, you can follow this guide on how to implement a Data Layer.
To implement a Data Layer the general approach is to use the following snippet on your website before pushing any data:
Once that is implemented on your website, you can start adding data to it and it will all gather up in a nicely, structured Data Layer.
How do you add data to the data layer?
The best way to add data to a Data Layer is by using the Data Layer push method. Here’s an example snippet of adding data by using the Data Layer push:
As soon as data is pushed to the Data Layer it will be available for all of your tools to use for analytics, personalization or whatever else you want to use it for.
Another important thing to do when you make a dataLayer.push is to add an event name. Without it, it cannot be used as a trigger in Google Tag Manager. The data will still get pushed, but instead of having a custom event that can be used as a trigger, it'll simply show up as "Message" in your preview & debug mode and you will be unable to use it as a custom event trigger.
So whenever you push data, remember to add an event name. As long as the name is something unique you will be able to make a trigger for it and use it for any tag you'd like.