Schema.org was a collaborative project between Google, Bing, and Yahoo. As such, the Schema that is added to your site will be readable across all of the main search engines.
There are hundreds of markup types – from restaurants, recipes, and movies, right down to the very niche. If you have any data on your website, there’s a good chance that it’s going to have an associated Schema type.
How to implement Schema
Schema markup can be implemented to your website in different ways using syntaxes. For Schema.org vocabulary, the best way to add markup to your site is either through the Microdata format or JSON-LD.
With Microdata markup, your structured data is integrated within the main HTML of the page. JSON-LD, on the other hand, uses a JavaScript object to insert all of your markup into the head of the page, which is often a cleaner, simpler implementation from a development perspective.
Originally, the Microdata approach was recommended for SEO purposes, but Google’s JSON-LD support has improved such that this format is now their recommended method for implementing structured data.
Umbraco has written a very detailed guide of what schema markup is and how to effectively write, implement, and test it.
Implementing Schema in Umbraco
Implementing Schema markup on your website is simple. Our step-by-step guide to adding Schema to your Umbraco site explains all there is to know.
1. Choose your Schema type
With so many different types of Schema available, it can be hard to identify which type is best for your page. Schema.org offers a full list of Schema types within a hierarchy. Common types include Action, CreativeWork, Event, Organization, Person, Place, and Product, with more specific types located underneath each category.
2. Use a Schema generator
You don’t have to be a coding genius to implement Schema markup. These days there are plenty of structured data generators, including this one from Merkle.
Most generators will start by asking you which type of Schema you would like to create by offering a few broad options from a dropdown menu. From here, you can narrow the Schema type down to a specific type, or you can simply search for which Schema type you need.
Depending on the type you have chosen, you will be presented with a series of fields which you can then populate with information. These are fairly self-explanatory, and most are optional. As you populate the generator with information, the generator produces the same information in JSON-LD format.
3. Test your Schema
Before updating your website with any structured data, it’s important to check that it works. Using Google’s Structured Data Testing Tool, you can check to see if there are any errors in the generated code.
Upon opening the testing tool, select the ‘Code Snippet’ tab, paste the generated code and click ‘Run Test’. This only takes a few seconds and will highlight any issues with the code, including any required fields that have been missed.
4. Add the Schema markup to your page
There are three options when adding Schema markup to your website using Umbraco.
a) Add the Schema markup to your page through a field
Adding Schema markup to your page this way couldn’t be easier. All you need to do is navigate to the page you want to apply it to using the content hierarchy to the left of the Umbraco interface, select the SEO tab at the top, and paste the JSON-LD code into the field labeled ‘SchemaMarkUp’.
Once you’ve clicked ‘Save and publish’, you’ve successfully implemented Schema markup to your Umbraco page.
Note, if you don’t have the ‘SchemaMarkUp’ field enabled in your Backoffice, don’t worry. To enable the field, simply navigate to your Settings, under Document Type choose your main page type and add a new Textbox property to your SEO tab and name it something like ‘SchemaMarkUp’. Once you have added the new property you have to add it to your template so the JSON-LD script is rendered on the pages.
b) Add Schema markup to your page through templates
If creating and testing new Schema for every page on your sites seems like a laborious task, then fear not; by adding Schema markup using templates within the CMS itself it is in fact possible to bypass all of the previous steps! This option is especially useful if you have a lot of content, as it will save you from having to generate new Schema markup for every blog piece. Instead, the template will pull through the required data for each page.
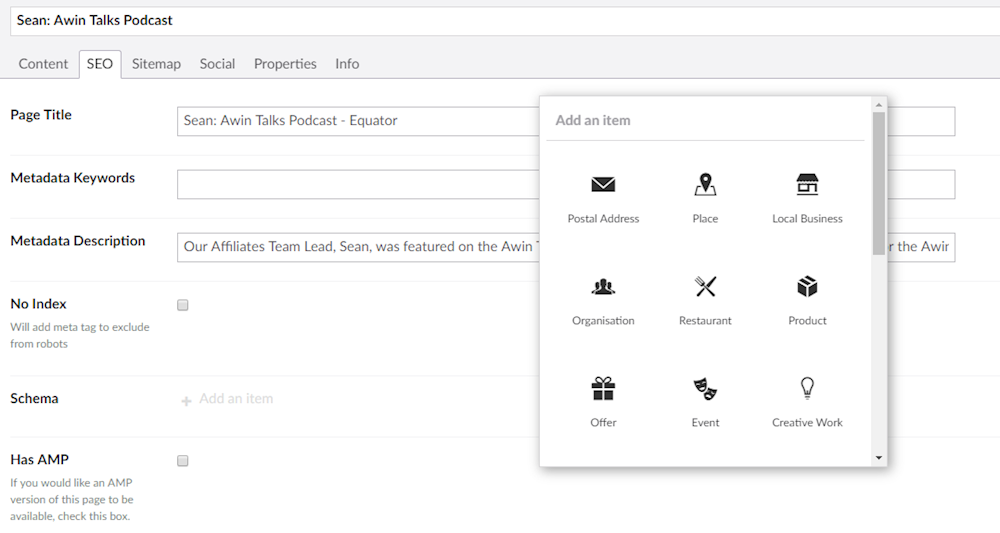
Let’s look at Equator as an example. By building a Schema selector within Umbraco with various Schema types available, the content editor doesn’t even need to go to the bother of using a Schema generator and testing it themselves.
 Click to enlarge image (new tab)
Upon choosing the Schema type, the content editor can fill out the fields as necessary. This then dynamically populates the Schema markup within the source code of the page.
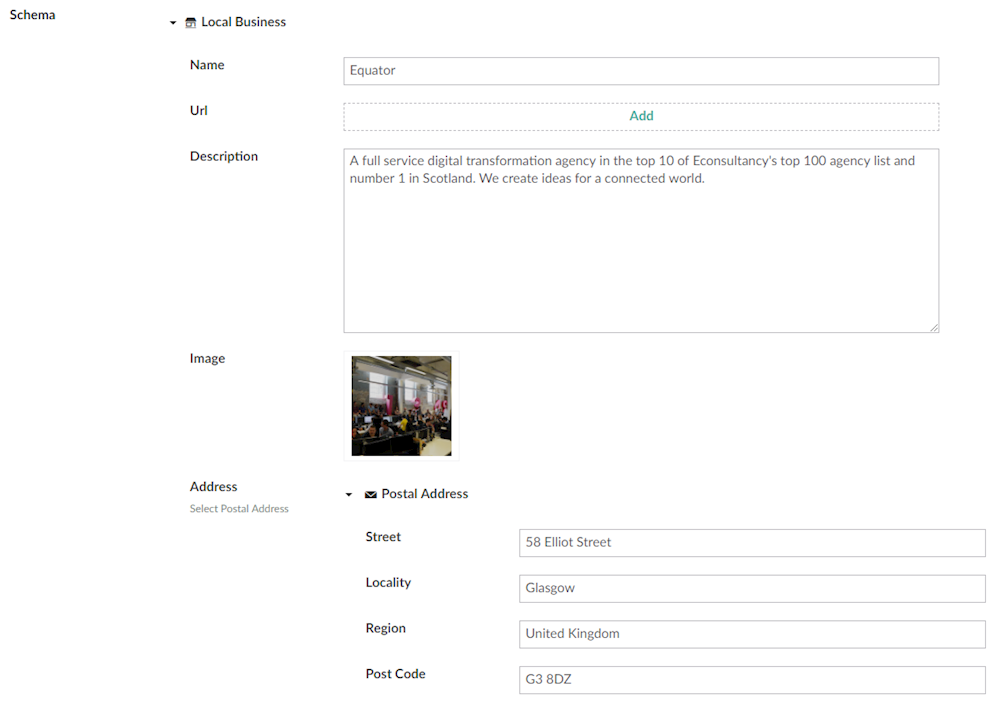
Using a LocalBusiness Schema as an example. here’s what this looks like from within the Umbraco:
 Click to enlarge image (new tab)
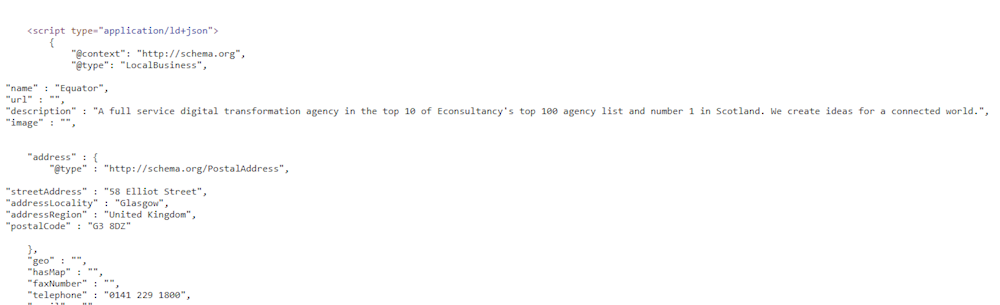
Once implemented, we can see this data populated within the source code of the page:
 Click to enlarge image (new tab)
Implementing Schema in this way will definitely require some developer input but will make life a lot easier for the content editor, especially if there is a large volume of content on the site.
c) Add Schema markup in templates automatically
The last way to add Schema markup is to do it all in the template and have the relevant types automatically populated without any editor input. This method is very similar to the second since it also requires a developer. The key difference is that instead of having an editor choose the type and fill out the fields on each page, this is done automatically in the template.
This can be very useful in two situations:
- If the markup is the same on all pages. An example of this is the ‘Organization’ type, where info stays the same.
- If you have a lot of content where you won’t be able to manually fill it out on all pages. This can be your blog, where you have many posts that all share the same template
Here we can take Umbraco.com as an example where this method for adding Schema markup is used in both situations. To save time the ‘Organization’ type is added directly in the templates with fixed values, so it is consistent on all pages. This saves time for the editor since they do not have to add it on any pages manually.
Just be aware that you will need a developer to change anything if a value needs to be changed. This could be if your company changes its logo or phone number.
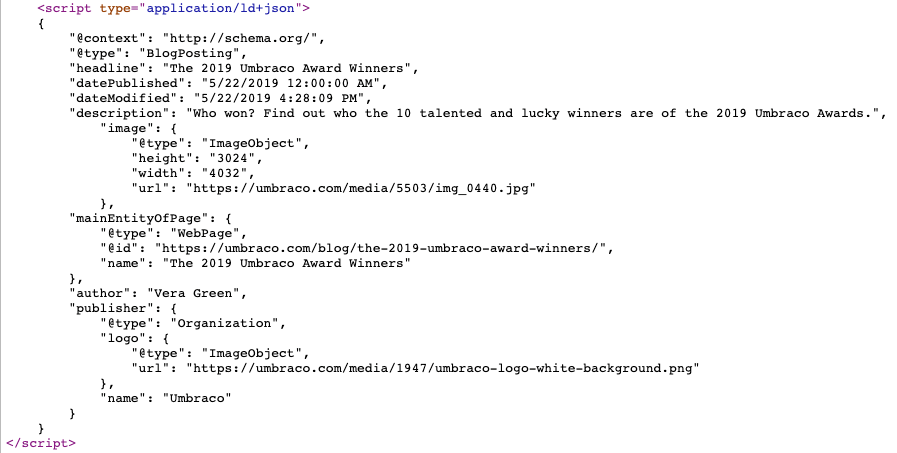
Similarly, the ‘BlogPosting’ type is added to the blog page template, but instead of fixed values, it is dynamically filled out depending on attributes on the individual blog post. Which attributes to use differs depending on how your Umbraco site is built. But by taking advantage of fields that are always filled out when posting a new blog post, you can make sure it is filled out correctly. Below is the script used for the Umbraco.com blog template, where properties such as headline, date published, description, and author are all filled out dynamically and added in the final output.
 Click to enlarge image (new tab)
The end result for a blog post is seen below (using this blog post as an example):
 Click to enlarge image (new tab)
There you have it - three methods to adding Schema markup to your website! The right method depends on your situation and needs, but by following our guide you have everything you need to get started.
Of course, we have to caveat this by noting that adding Schema to your site doesn’t always mean it will be used by search engines, as they may deem competitor content more useful for the user. Like with everything else in SEO, it’s important to ensure that the content you publish offers them value.
It can also take some time for search engines to pick up new structured data. But once they do, your content is more likely to rank. And as we know, higher ranking content with appropriately implemented Schema markup will benefit from higher click-through rates and an uplift in traffic to your site.