Learn all about tracking Umbraco Forms with Google Tag Manager
Written byLars Skjold Iversen
Tracking what your website visitors are doing on your website is very important, but can sometimes be tricky to actually do right. That’s why I have written this post to help you with how to properly track one of the most important things on many websites: Form submissions. In this post, you will get a solid workflow and 4 different methods on how to track your Umbraco Forms - 3 of them without involving a developer at all! Let’s dive right in:
Why you should care about tracking your forms
“Half the money I spend on advertising is wasted; the trouble is I don't know which half” - John Wanamaker
The classic quote from marketing pioneer John Wanamaker dates all the way back to his lifetime in the late 1800s and early 1900s. And it may have been true for many decades after, but since the introduction of the internet and web analytics tools, you should no longer accept the quote as truth.
If you run an ecommerce site, it’s a no-brainer to set up ecommerce tracking, so you can see which of your online channels generate the most revenue. The same should be true for non-ecommerce sites and tracking contact forms.
While it might not be as exciting and won’t let you throw around cool buzzwords like ROAS, ROI or Average Basket Size, it should still be something you should care about.. If you’re using your website to generate leads of any kind through contact forms, you should care that you’re tracking them - and doing so correctly - in order to properly measure your website performance.
Luckily, that’s exactly what you’ll be able to do at the end of this post. By going through 5 simple questions later in this post, you will be able to pick one of the 4 possible methods and get your forms tracking up-and-running.
When it comes to web analytics and tracking, it is important to mention that this can be done in various ways and by using many different tools.
One of the most popular ones for web analytics is Google Analytics which is used by a very large amount of websites today. For that reason I will be showing you how to track and send data to Google Analytics. You will, however, still be able to use the methods mentioned in this post if you use another platform like Adobe Analytics or want to send it on to other ad platforms such as Facebook, LinkedIn or Google Ads.
To control all of our tags and triggers we have also chosenGoogle Tag Manager as our tag management solution.
If you are unfamiliar with Google Tag Manager, it is a way to control and fire all your tracking scripts such as Google Analytics pageviews, events, transactions, and much more. While this can be done by adding the Google Analytics scripts directly in the code, Google Tag Manager gives whoever is working with it - usually someone in marketing - much more freedom to implement tracking (such as forms tracking) without having to involve a developer.
While there’s nothing wrong with using a developer to help you out, it does help quite a lot to just be able to do it yourself, so your developer can do other awesome things ;-)
Just to be clear:
The main focus in this post will be to show you just how you can make sure your Umbraco Forms are being properly tracked and sending the correct data to Google Analytics.
Now you might think"Isn’t there already a really easy and built-in way to do all of this in Google Tag Manager?"
Click to open image in new window
Yes, there is.
But...
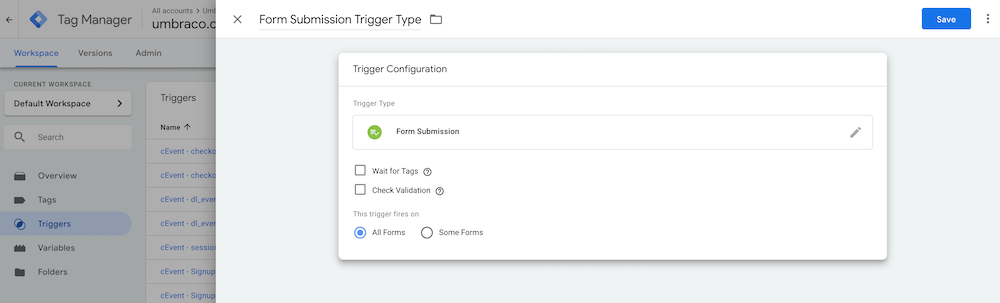
The Google Tag Manager trigger is broken
The main advantage of using Google Tag Manager is that it has a lot of powerful built-in functionalities that significantly help you out when it comes to fulfilling all of your tracking needs. One of these is the built-in form submission trigger type.
This built-in trigger type enables you to track any form that is submitted, which is what we are trying to accomplish here. While it does work for some, but not all forms,there is one main problem:
It runs without validating whether a form was submitted successfully or not.
Which means that if you care about accurate data, this will not work for you - and I really hope you do care!
In real-life situations, this means that anytime anyone tries to submit a form it will fire your event and you will be tracking it as a form submission in Google Analytics. Even if there was an error.
Now in a perfect world where no one ever makes mistakes, this could be just fine. But in the real world, it poses a big problem for you as your tracking will be inaccurate.
So did I write this post just to tell you,“too bad, doesn’t work!”?
No, of course not! I’m here to tell you that there are several options on how to fix it and get proper data.
It all starts with a proper workflow for you to decide which method to use to track your form. While the focus will be on Umbraco Forms from now on, I would like to remind you that the workflow and methods can be used for every type of form - even if you use a different Forms builder in Umbraco or (for some odd reason) use a different CMS ;-)
Form Tracking workflow that actually works
Since contact forms can have very different logic and be built in many different ways, it is hard just to have one solution for a trigger you can copy/paste that works for everyone.
Well, actually, aData Layer push will work for all forms, if implemented correctly, but usually, it requires a developer that has the time to help you out. While that is great if that is the case for you, the whole point of using Google Tag Manager is to limit the amount of developer resources needed for doing these kinds of things. So in my workflow below, there are some things you as a marketer can try before resorting to the Data Layer push method.
Even if you are working with Umbraco Forms, there is no golden solution. It all depends on how you implement it and which workflow you have set up for your form.
As an example, forms that display a “thank you” message are different from a form that redirects you to a “thank you” page.
Although the one golden solution doesn’t exist, I have limited it to 4 different methods. And don’t worry, I won’t force you to go through all 4 solutions. To find out what will fit you best, I’ll start by asking you 5 workflow questions, and based on your answers, guide you to the solution that’ll suit your current workflow the best:
5 workflow questions to help you find the right trigger
To use the workflow below, it is important that you already haveGoogle Tag Manager on your website as we will need to test it using the Preview & Debug mode. If the Google Tag Manager container is not on the website, you can test it by injecting it onto the page, but that should not be the case if you want to use Google Tag Manager for tracking.
With Preview & Debug mode activated, it is now time to go to the page where you have the form you want to track. Then you run through the questions below when you have submitted the form to find the right method for tracking it:
#1: Did the built-in Google Tag Manager Form Submission Trigger work?
If yes, you can use that and set up your tags. This is the easiest option, but it will rarely work due to it not waiting for validation and resulting in wildly inaccurate data. So while it’s not recommended, in some very rare cases, it might work for you.
If no, start over with the workflow and try again.
Method #1 - “Thank you page” form tracking
The first method is one of the simpler ones (hey - lucky you ;) ) and works by tracking page views on the given “thank you page” URL. If you are redirected to a new page after submitting a form, then you know that anyone visiting this page has successfully submitted a form.
This is quite simple to track as you will just need a simple pageview trigger and fire your Google Analytics event tag whenever someone visits this page URL.
This will give you accurate data, but be aware that there will be cases where the data can still be inaccurate. That’s the case if:
More than one form share the same thank you page.
Someone can land on the thank you page in another way than by submitting the form.
If you want to test if either of these cases is an issue for your forms, simply follow these steps:
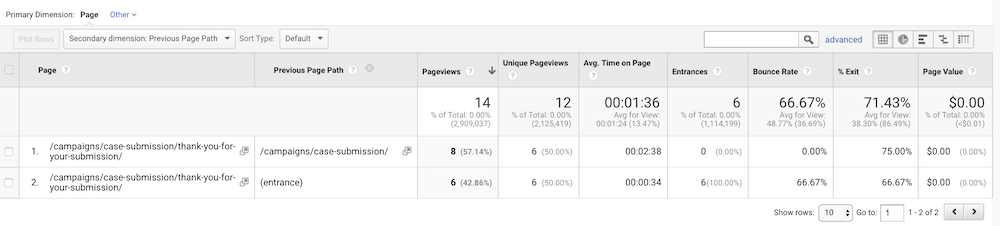
Once logged in, go to Behavior > Site content > All pages.
Now you need to find the thank you page on your website and click on it, so you only see data for that one URL.
Then you add the “Previous page path” as your secondary dimension and see which URLs are sending traffic to your thank you page.
And that’s it! Well, unless you have multiple pages as that might require you to make modifications to how you are tracking your form. I’ll tell you:
Click to open image in new window
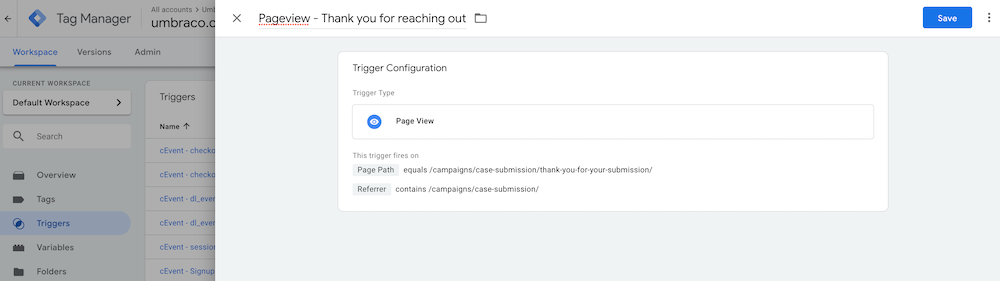
If you do have multiple pages and you want to differentiate between the forms, you will need to modify your trigger so it only includes the form you want to track.
Luckily this is quite simple to do with the built-in variable called “Referrer”. This will be the URL called “Previous page path” in Google Analytics. All you have to do is modify your trigger so another condition is that the “Referrer” is the URL that your form is on.
Click to open image in new window
Now that you have the right trigger, you can set up your tag and test in Google Analytics real-time, to see if the data is sent correctly. The tag setup will vary greatly depending on what you want to track and how you want it to be displayed in Google Analytics. Below is an example.
Click to open image in new window
Method #2 - “Element visibility” form tracking
If the page did not reload or the URL did not change when you submitted the form, you will not be able to use method #1 as your form does not result in a new pageview.
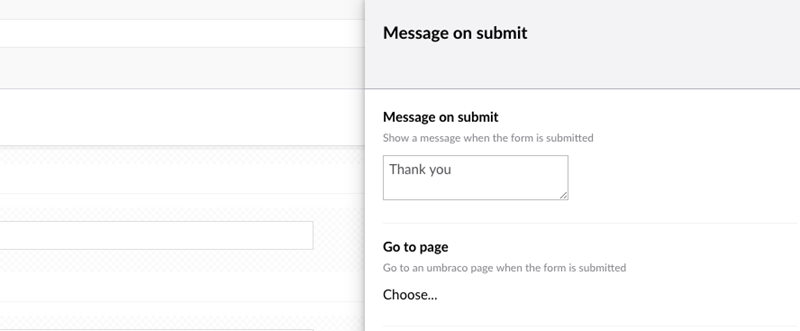
If your form does not redirect to a new page, it usually displays a message that acknowledges that the form has been submitted. With Umbraco Forms, this text can be configured in the workflow settings by using the “Message on submit” and filling out the text field.
If this is the case, then your next option for tracking the form submission is to use the built-in “Element Visibility” functionality from Google Tag Manager.
This trigger type will look for either element IDs or classes (CSS Selectors) in the page HTML and will trigger if one becomes visible to the website visitor.
By using this built-in trigger type, we can instruct Google Tag Manager to trigger if a certain element ID or class becomes visible to the visitor. It does require some adjustments, though.
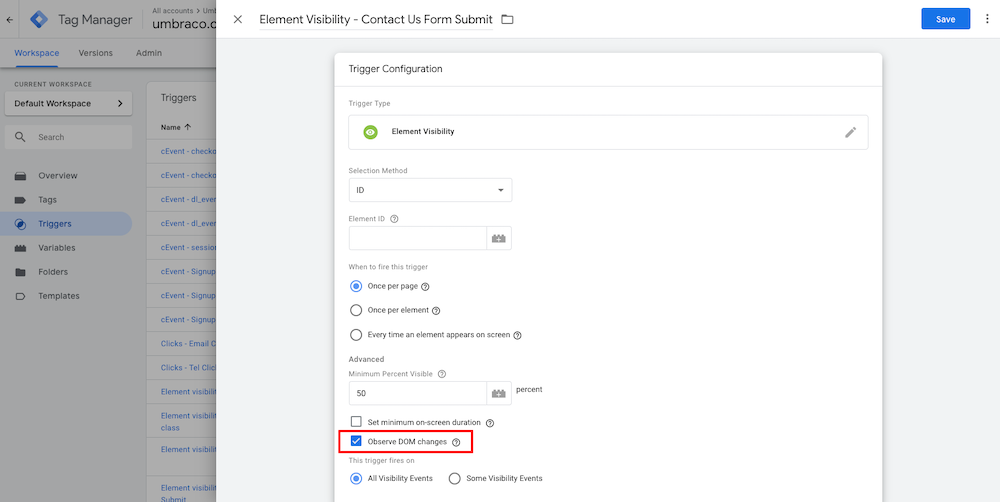
The “Element visibility” trigger will only observe the given elements in the HTML once the DOM is ready and can only trigger based on the IDs and classes available at that time. Since our thank you message will only show up later - after DOM is ready - we will not be able to catch it, and our trigger will not work.
There is a way to fix that, though.
Click to open image in new window
By enabling “Observe DOM changes,” we can fix this. As the name implies, it will allow Google Tag Manager to keep an eye out for any changes that might happen to the elements.
If something changes - say a form is submitted and a thank you message is shown - it will register these changes and will be able to find the newly available IDs or classes that are now visible.
A quick warning before we continue:
Observing DOM changes while using the CSS selectors (the one that looks for element classes) can hurt your site performance (after load) if you are not careful and use it correctly. If you are targeting too broad CSS selectors and it matches a large number of elements on a page it has a lot of changes to observe and thereby will cause performance issues.
For that reason, if at all possible, you should use an ID. If it is not possible, then make sure your CSS selector is as specific as possible.
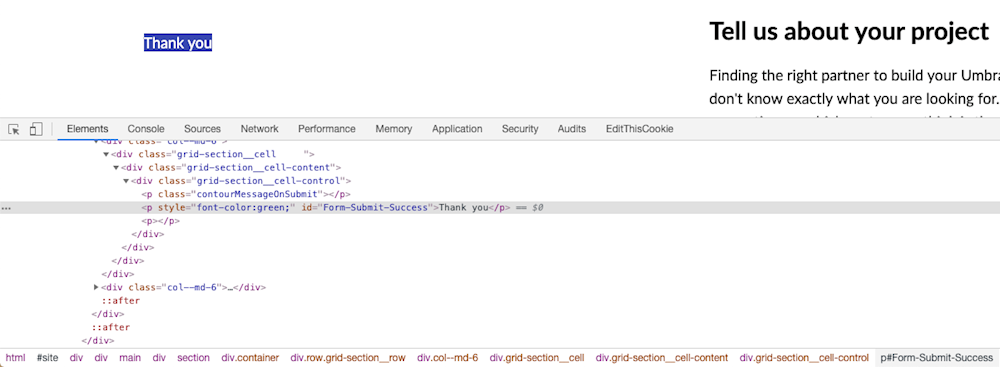
To find the right ID or element, you will need to inspect the thank you message that is displayed and see how you can set up your trigger.
Click to open image in new window
In the above case, we have an ID - “Form-Submit-Success” and can use the below trigger to fire tags when it is visible.
Click to open image in new window
If your submit message does not have an ID, you will have to look for an element class as an alternative solution. With Umbraco Forms, you will usually find a very distinct class that is used for form submits, so even if you don’t have an ID, you can still be quite accurate with your tracking.
In the screenshot above you can see the very specific class “contourMessageOnSubmit,” that is not going to be found in any other situation than if a form is submitted. Here we could also have used that as our CSS Selector.
The class can vary, so remember to always test it yourself on your own Umbraco site.
Click to open image in new window
Method #3 - “AJAX events” form tracking
AJAX forms are very popular, and a lot of the forms you will use are probably built with AJAX. And if method #1 did not work out for you, you can still choose to use this method over the above “element visibility” method if you want to.
The reason I put this as #3 instead of #2 is simply that Umbraco Forms does not use AJAX events out of the box. Unless your developers have customized your forms, it makes more sense to check for element visibility before trying AJAX events.
To be clear: If you want to use AJAX with your forms, this method will work for you just as well as “Element visibility.”
While “Element visibility” works with built-in functionality, AJAX events do not. We have to build something to makes Google Tag Manager listen for these events.
This is done by implementing a custom HTML tag that fires on all pages with some JavaScript that enables the AJAX event listener. And don’t worry, you won’t have to build it from scratch, but can instead use this one that the awesome people over at Bounteous have created.
We can’t guarantee that this works for you, so please make sure to test it before publishing it to a live environment.
Once our AJAX event listener tag is activated, it is time to test the form and see if AJAX events start showing up in preview and debug mode.
If the form is indeed using AJAX, then you will see a lot of events appearing once you start filling out the form. This is a natural way of how the listener works, but in terms of tracking form submissions, we are only interested in the very last AJAX event where the form is submitted.
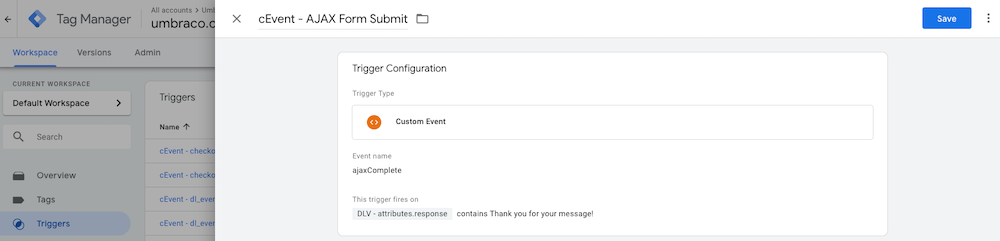
You will also see that all of your AJAX events will have the same event name - ajaxComplete. Since we are only looking to trigger our tag when the form is submitted, we need to differentiate the final submission event from the rest of the events.
To do that, you will need to look at the very last AJAX event in Preview & Debug mode and go to “Data Layer.” Here you should be able to see how it differentiates from the other AJAX events.
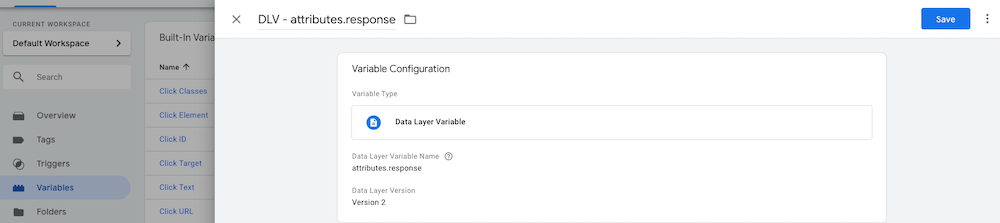
The exact way it differentiates differs a lot, depending on how you set up your form, but in most cases, you will find the “response” to be different and the one to use. To use it is quite simple as soon as you have set up a data layer variable.
Let’s walk through an example
If your response comes back as “Thank you for your message!”, then all you have to do is create a data layer variable that listens for the response, and use that to trigger your tag. A setup would look something like the below.
Data layer variable
Click to open image in new window
Trigger
Click to open image in new window
Method #4 - “Data Layer push” form tracking
The fourth and last method I will walk you through is going to require some help from a friendly developer. If none of the first 3 methods worked for you, then I’m afraid I have no other good method for you to use (there are some alternatives, but they are too unstable, so I will not recommend them). You need to get a hold of your developer to talk about setting up a Data Layer push (If they need some help, I've just publisheda developer's guide to the Data Layer you can share with them).
Even though Google Tag Manager is a great platform to do a lot of things as a marketer without involving developers, there are limits - and this is one of them. Before you get too sad that none of the other methods worked let me just be clear: This solution is by no means worse than the others listed above - quite the opposite actually. If you have a developer ready to help you out, then you could just skip the entire workflow above and go straight to this method, since it’s a very robust and clean way of tracking your forms.
Quick refresher of what the Data Layer is
The Data Layer is an invisible layer where all data is pushed to and gathered for you to use in Google Tag Manager. The data in the Data Layer can come from all sides, meaning it can be pushed there from your code by a developer (what we want to do here), but also from Google Tag Manager or even website extensions. The Data Layer is truly a magical place, and by pushing data to it, you will have the option to use that data in your tags, triggers, and variables.
The only “issue” with using the Data Layer for form tracking is that it can be complex for a non-developer. Luckily the code itself is not very complex, so you should not be scared to ask your developer to implement it. In the right hands, it will be a very fast and smooth setup.
...and back to the method
When a form is submitted there are already scripts running that determines what happens next - displaying the thank you message, sending the data to Umbraco back-office, and so on. This needs to be expanded, so it also includes a script that pushes data to the Data Layer.
What you include in the push is up to you, but if you want to go with something very simple, then the below will work like a charm:
Once this is implemented, you will be able to see an event pop up in your Preview & Debug mode with the name “contactformSubmit”. This event is all we need as we can now create a custom event trigger that will fire if that event happens on our site.
If you’re not seeing the “contactformSubmit” event in your Preview & Debug mode, it might be because your page automatically refreshes before it shows up. In that case you should set up a Google Analytics Event and use Google Real Time to check if it’s working.
Below is an example where I have added some extra info to the push, so it also includes the form type. This can be turned into a data layer variable and used in my tags or triggers.
To trigger a tag on the new “contactformSubmit” event, all we have to do is add it as a custom event trigger, and it will work like a charm.
Click to open image in new window
Now you should be all set up for tracking your form submissions, but now that you are working with the Data Layer, there aretwo important things you should know (or rather, your developer should know).
The first is that when working with the Data Layer, it is important not to accidentally overwrite information that’s already there. To avoid that, simply instruct your developer to always use the first two lines of the code script above.
Some mistakenly use “dataLayer = [{}]” which declares the Data Layer and thereby overwrites the current Data Layer and only includes the data included in the push. This is not something you want to happen, and it will create unhappy days for you and your tracking. Unfortunately, this is a common problem, since Google has put this method in theirofficial documentation (for whatever reason), so don’t let that confuse you - use the script provided in this post and everything will work as it should.
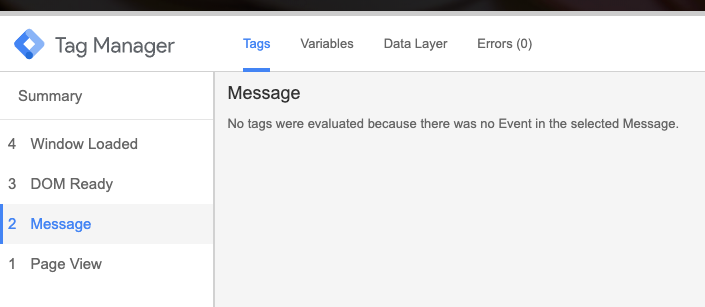
Secondly, while you can choose to include more data in your push, it is essential that you always have “Event” in
there. If not, you will not be able to use a custom event trigger as the name that shows up in Preview & Debug mode will simply be “Message” and is a generic text that Google Tag Manager creates for events without names. And even if you try, you cannot make a trigger fire on that event.
That was it! I hope you were able to find at least one of my 4 solutions helpful so you’re now able to use Google Tag Manager to track your Umbraco Forms in order for you to get better and more accurate data in your analytics platform.
If you have any questions, comments or additions to the blog post, feel free to send me an email at lsi@umbraco.com. I love to talk about tracking, data and attribution with anyone who will listen :-)
Schema Markup is a great way to improve your performance in the search engines. But implementing it can be tricky. Today Equator, an Umbraco Gold Partner, will show you how to implement Schema Markup when using Umbraco.